Senin, 31 Maret 2014

The definitive guide to building data-driven Android applications for enterprise systems

Android devices represent a rapidly growing share of the mobile device market. With the release of Android 4, they are moving beyond consumer applications into corporate/enterprise use. Developers who want to start building data-driven Android applications that integrate with enterprise systems will learn how with this book. In the tradition of Wrox Professional guides, it thoroughly covers sharing and displaying data, transmitting data to enterprise applications, and much more.
  • Shows Android developers who are not familiar with database development how to design and build data-driven applications for Android devices and integrate them with existing enterprise systems
  • Explores how to collect and store data using SQLite, share data using content providers, and display data using adapters
  • Covers migrating data using various methods and tools; transmitting data to the enterprise using web services; serializing, securing, and synchronizing data
  • Shows how to take advantage of the built-in capabilities of the Android OS to integrate applications into enterprise class systems
Enterprise Android prepares any Android developer to start creating data-intensive applications that today’s businesses demand

October 28, 2013  1118183495  978-1118183496 1


Read More..
Hey there.

If you are a cheap ass like me and you dont want to spend any money on an android screencast app, I will tell you today how you can make a really cool video from your android apps with free software!

All you need is linux :)

Recording the android emulator
To record your screen you need istanbul.


  • After you started it, you will notice a small icon on the upper right of your screen. 
  • Do a right click on it and select "select window to record" and select your android emulator. 
  • After this you can click on the icon to stat recording and do what ever you want with your app.
  • If yo are finished, click again on the istanbul icon to stop it and save the video somewhere as "appvideo.avi".


Fixing your video
Istanbul has some problems, so you have to run the following command to fix the video file:
For this you need mencoder.

"mencoder appvideo.avi -ovc lavc -lavcopts vcodec=mpeg4:vpass=1 -oac copy -o appvideo_fixed.avi"

Cropping your video
After this step you are ready to get rid of the emulator screen around your video. This can easily be done using avidemux.

  • Open avidemux and load the file "appvideo_fixed.avi"
  • Now on the left under "video" select "copy" and set it to something like "MJPEG". 
  • Select "Filter" and choose crop filter. You can now crop the emulator out of the video. Best settings for me are left: 20, top 20, bottom 20 and right 435.
  • Now click save and you are done!


Upload your video to youtube and enjoy!

To fix all videos created by istanbul, use this script:

#!/bin/bash
FILES=*.avi
for f in $FILES
do
echo "Processing $f"
mencoder $f -ovc lavc -lavcopts vcodec=mpeg4:vpass=1 -oac copy -o "$f"_fixed
 

 # do something on $f
done


Read More..

Minggu, 30 Maret 2014

Learning C 6 Subprograms

I jus rewrote and corrected the code of the app from LESSON #4 because on run it had an error: "Segmentation fault (core dumped)". But I wanted to complicate it and I added a new function that transfor an array in a matrix and I worked with subprograms because I think its more clearly and nice. So, the same example:
Transformation from matrix to array:
1 2 3 4
5 6 7 8= A[3][4] where A.lin=3 and A.col=4 so => V.elem=3*4=12
9 0 1 2
So 
1 2 3 4 5 6 7 8 9 0 1 2= V.vector[12]
The formula is:
k=A.col*i+j 

Transformation from array to matrix:
1 2 3 4 5 6 7 8 9 0 1 2= V.vector[12]=> V.elem=12.=>
1 2 3 4
5 6 7 8=A[3][4]
9 0 1 2
The formulas are:
i=k/A.col and j=k%A.col
And the code is:
-----------------------------------------------------------------------------------------------
def.c
typedef struct{
double **matr;
int lin;
int col;
}Matrice;
typedef struct{
double *vector;
int elem;
}Array;
int i,j,k;
Matrice A,B; Array V;
-----------------------------------------------------------------------------------------------
functii.c
// citire matrice
void citire_matr(Matrice A){
     for(i=0;i<A.lin;i++)
                    { for(j=0;j<A.col;j++)
                                     scanf("%lf",&A.matr[i][j]);
     }
}
//afisare matrice
void afisare_matrice(Matrice A){
     for(i=0;i<A.lin;i++)
                     {for(j=0;j<A.col;j++)
                                     printf("%lf ",A.matr[i][j]);
                     printf("
");
                     }
     printf("
");
     }
//afisare vector
void afisare_vector(Array V){
     for(k=0;k<V.elem;k++)
                       printf("%lf ",V.vector[k]);
     printf("
");
     }
//transformare matrice->vector
void matr_vector(Matrice A, Array V){
      for(i=0;i<A.lin;i++)
                     for(j=0;j<A.col;j++)
                                     V.vector[A.col*i+j]=A.matr[i][j];
     }

//transformare vector->matrice

void vectortomatr(Matrice B, Array V){
    i=j=k=0;
    while(k<V.elem){
    B.matr[k/B.col][k%B.col]=V.vector[k];
    i++;j++;k++;
    }
}

-----------------------------------------------------------------------------------------------
main.c
#include<stdio.h>
#include<stdlib.h>
#include "def.c"
#include "functii.c"
int main(){
printf("Nr de linii si numarul de coloane este:");scanf("%d %d",&A.lin,&A.col);
V.elem=A.col*A.lin;
B.lin=A.lin; B.col=A.col;
A.matr=(double **) malloc(A.lin*sizeof(double*));
B.matr=(double **) malloc(B.lin*sizeof(double*));
V.vector=(double *)malloc(V.elem*sizeof(double));
for(i=0;i<A.lin;i++) // aloca memorie pt elem din linia i
    if((A.matr[i]=(double *)malloc(A.col*sizeof(double)))==NULL || (B.matr[i]=(double *)malloc(B.col*sizeof(double)))==NULL)
      {
      printf("
 memorie insuficienta");
      exit(1) ;
      }
else 
if(V.vector==NULL)
{
      printf("
 memorie insuficienta");
      exit(1) ;
      }
citire_matr(A);
printf("Afisare matrice:
");
afisare_matrice(A);
matr_vector(A,V);
printf("Afisare vector:
");
afisare_vector(V);
vectortomatr(B,V);
printf("Afisare matrice:
");
afisare_matrice(B);
free(A.matr);
free(B.matr);
free(V.vector);
system("pause");
return 0;
}

-----------------------------------------------------------------------------------------------
     

Read More..

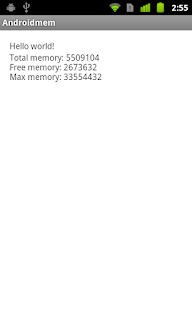
Get memory information

Example to get memory information using Runtime.

memory information


package com.example.androidmem;

import android.os.Bundle;
import android.app.Activity;
import android.widget.TextView;

public class MainActivity extends Activity {

@Override
protected void onCreate(Bundle savedInstanceState) {
super.onCreate(savedInstanceState);
setContentView(R.layout.activity_main);

TextView memInfo = (TextView)findViewById(R.id.meminfo);

String info = "";

info += "Total memory: " + Runtime.getRuntime().totalMemory() + "
";
info += "Free memory: " + Runtime.getRuntime().freeMemory() + "
";
info += "Max memory: " + Runtime.getRuntime().maxMemory() + "
";

memInfo.setText(info);
}

}


<LinearLayout xmlns:android="http://schemas.android.com/apk/res/android"
xmlns:tools="http://schemas.android.com/tools"
android:layout_width="match_parent"
android:layout_height="match_parent"
android:paddingBottom="@dimen/activity_vertical_margin"
android:paddingLeft="@dimen/activity_horizontal_margin"
android:paddingRight="@dimen/activity_horizontal_margin"
android:paddingTop="@dimen/activity_vertical_margin"
android:orientation="vertical"
tools:context=".MainActivity" >

<TextView
android:layout_width="wrap_content"
android:layout_height="wrap_content"
android:text="@string/hello_world" />
<TextView
android:id="@+id/meminfo"
android:layout_width="wrap_content"
android:layout_height="wrap_content" />

</LinearLayout>


Read More..

Sabtu, 29 Maret 2014

Dropdown menu bar in css and html

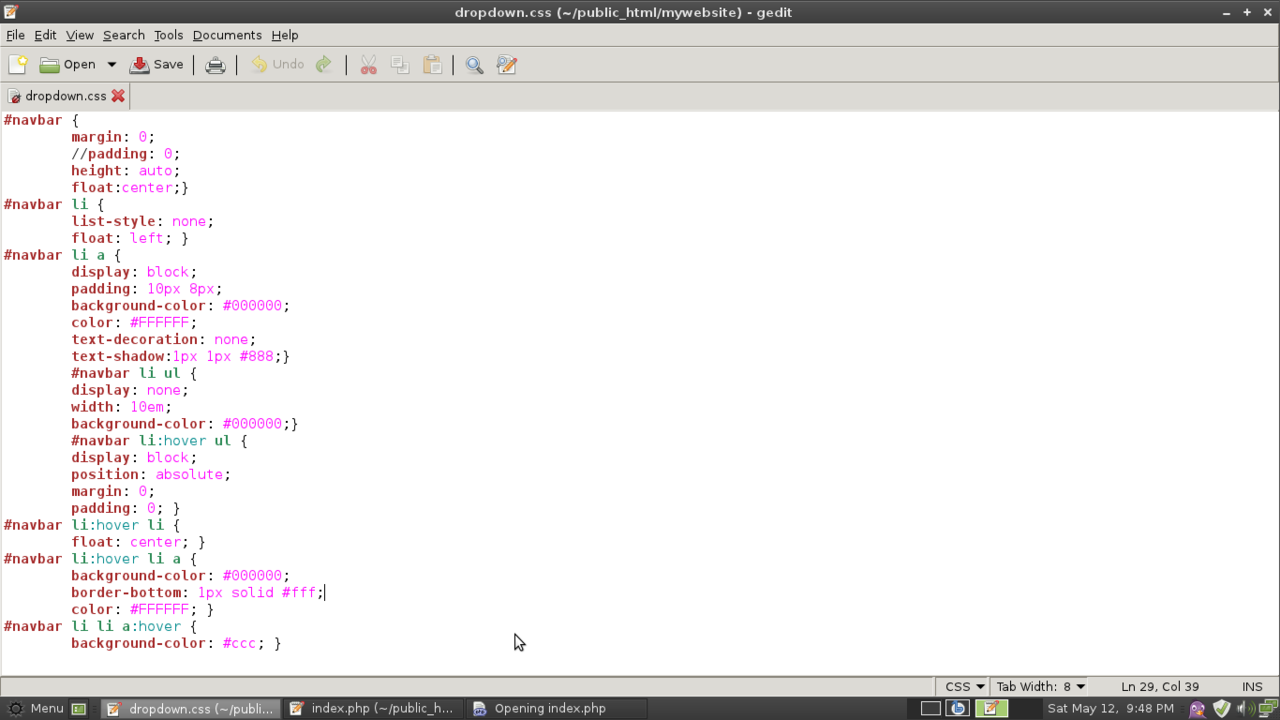
A dropdown menu-bar created in css and html for my website… To use it you must replace the links with your owns and insert how much lists you want!
the css file

the html file


Read More..

Brightness Example In Android

Description:
This example shows how you can change brightness settings on device through coding.
Algorithm:
1.) Create a new project by File-> New -> Android Project name it BrightnessExample.
2.) Set write permission to devic’s settings in manifest file. Write following into your manifest file:
<?xml version="1.0" encoding="utf-8"?>
<manifest xmlns:android="http://schemas.android.com/apk/res/android"
   package="com.example"
   android:versionCode="1"

   android:versionName="1.0" >
    <uses-sdk android:minSdkVersion="10" />
    <application
       android:icon="@drawable/ic_launcher"
       android:label="@string/app_name" >
        <activity
           android:label="@string/app_name"
           android:name=".BrightnessExample" >
            <intent-filter >
                <action android:name="android.intent.action.MAIN" />
                <category android:name="android.intent.category.LAUNCHER" />
            </intent-filter>
        </activity>
    </application>
        <uses-permission android:name="android.permission.WRITE_SETTINGS"/>
</manifest>
3.) Write following into your main.xml:
<?xml version="1.0" encoding="utf-8"?>
<LinearLayout xmlns:android="http://schemas.android.com/apk/res/android"
   android:layout_width="fill_parent"
   android:layout_height="fill_parent"
   android:orientation="vertical" >
    <TextView
       android:layout_width="fill_parent"
       android:layout_height="wrap_content"
       android:text="@string/hello" />
    <TextView
       android:layout_width="fill_parent"
       android:layout_height="wrap_content"
       android:text="Set BackLight of the App" />
    <SeekBar
       android:id="@+id/backlightcontrol"
       android:layout_width="fill_parent"
       android:layout_height="wrap_content"
       android:layout_margin="10px"
       android:max="100"
       android:progress="50" />
    <TextView
       android:id="@+id/backlightsetting"
       android:layout_width="fill_parent"
       android:layout_height="wrap_content"
       android:text="0.50" />
    <Button
       android:id="@+id/updatesystemsetting"
       android:layout_width="fill_parent"
       android:layout_height="wrap_content"
       android:text="Update Settings.System.SCREEN_BRIGHTNESS" />
</LinearLayout>
4.) Run for output.
Steps:
1.) Create a project named BrightnessExample and set the information as stated in the image.
Build Target: Android 2.3.3
Application Name: BrightnessExample
Package Name: com.example
Activity Name: BrightnessExample
Min SDK Version: 10
2.) Open BrightnessExample.java file and write following code there:
package com.example;
import android.app.Activity;
import android.os.Bundle;
import android.view.View;
import android.view.WindowManager;
import android.widget.Button;
import android.widget.SeekBar;
import android.widget.TextView;
public class BrightnessExample extends Activity {
    /** Called when the activity is first created. */
        float BackLightValue = 0.5f; //dummy default value
          @Override
          public void onCreate(Bundle savedInstanceState) {
              super.onCreate(savedInstanceState);
              setContentView(R.layout.main);
         
              SeekBar BackLightControl =(SeekBar)findViewById(R.id.backlightcontrol);
              final TextView BackLightSetting =(TextView)findViewById(R.id.backlightsetting);
              Button UpdateSystemSetting =(Button)findViewById(R.id.updatesystemsetting);
         
              UpdateSystemSetting.setOnClickListener(newButton.OnClickListener(){
          @Override
          public void onClick(View arg0) {
           int SysBackLightValue = (int)(BackLightValue * 255);
           android.provider.Settings.System.putInt(getContentResolver(),
             android.provider.Settings.System.SCREEN_BRIGHTNESS,
             SysBackLightValue);
       
          }});
      BackLightControl.setOnSeekBarChangeListener(newSeekBar.OnSeekBarChangeListener(){
          @Override
          public void onProgressChanged(SeekBar arg0, int arg1, boolean arg2) {
           // TODO Auto-generated method stub
           BackLightValue = (float)arg1/100;
           BackLightSetting.setText(String.valueOf(BackLightValue));
       
           WindowManager.LayoutParams layoutParams = getWindow().getAttributes();
           layoutParams.screenBrightness = BackLightValue;
           getWindow().setAttributes(layoutParams);
          }
          @Override
          public void onStartTrackingTouch(SeekBar arg0) {
          }
          @Override
          public void onStopTrackingTouch(SeekBar arg0) {
          }});
          }
        }
3.) Compile and build the project.
Output
Read More..

Rabu, 26 Maret 2014

Drum Set 1.5

Drum Set - a fully-ranged virtual drums for your Android device.
Drum set is a virtual set of drums with full range components. It includes sampled sounds of a variety of drums, cymbals, a tom and a kick drum – 17 drums in all, and all on screen at the same time.
Drum set supports multi-touch and enables you to play most popular beats. In future upgrades, you can expect many features. One of planned is sound recording feature so be in touch!

Piano For You 1.0.1

I tried to make a best piano app on the market, so any feedback is welcome!
- Good sounding (samples, no MIDI)
- Good looking
- Option for two stacked rows
- Recording
- Full keyboard (88 keys)
- Key labels
- Fast loading
- Multitouch support
- Sustain pedal
- No ads

Guitar - Virtual Guitar Free 1.1.0

Virtual Guitar - Never stop jammin'!
It's an electronic programmable guitar. Stylish, portable and practical, it is suitable for the students, for the ones who want to play with it, for entertaining friends, to amaze your partner, …
• Simple and complete
Everyone can play, no corns on your fingertips, no complicate finger positions. Expert guitarists can always show their abilities, arpegging thanks to multitouch!
• Always with you
On the beach, at a party, on the street, every moment is right for a serenade, karaoke or some jammin'. You have a guitar in your pocket!
Read more »
Read More..

Selasa, 25 Maret 2014

Dragon, Fly! 1.8

Slide and fly over the beautiful hills in this fast paced one touch arcade game.
As a newly hatched dragon pup you are still too young to fly. That however is not going to stop you from embarking on your very first adventure. The realms are full of curvatious hills. Slide along them and time your touches with precision to build momentum and take off into the sky. Be quick though! Dragon mum is anxious about your whereabouts and has headed out to end your journey and bring you back to the nest.

Flying Penguin best free game 3.1

This great success on the iPhone, Flying Penguin (or Racing Penguin) is also on android! fun game!
Slide down the mountains of Antarctica and flap your wings to fly. Go as fast as you can to escape from the polar bear.
if you like tiny wings you will love this cool physics based game.
3 addicting worlds, 24 racing levels, improve your skills to go faster than a car a motorbike or a shooting star. Escape from the funny bear.
get it while its free!
Read more »
Read More..

Samurai Shodown II v1 1 Apk SD Data

Samurai Shodown II apk

Download Samurai Shodown II Android For Free

Best Android Game, Samurai Shodown II is a fighting game that is very fun and exciting. How to play it easy, but hard to master. This game has a variety of interesting features in it. Began to fight in the arena single type of special that has been provided at this game! Are you a fan of fighting games? Try this game now, Free!

Features Samurai Shodown II:
- 15 characters with different abilities
- Possible use of a weapon during the fight
- Button on the controller screen special
- Multiplayer over bluetooth
- And many more.


Screenshot:
Samurai Shodown II
Samurai Shodown II
Samurai Shodown II
Samurai Shodown II


Download Samurai Shodown II Apk+Data here

Instructions :
  • Install APK
  • Copy ‘com.dotemu.neogeo.samsho2′ folder to ‘sdcard/Android/‘
  • Launch the Game
  • And Enjoy With Play This Games..!!!!
Read More..

Senin, 24 Maret 2014

NV Night Vision Texting v1 0 apk


With NV, you can text in the dark without hurting your eyes / disturbing others !


NV - Night Vision Texting 1.0market.android.com.siriusapplications.owl
NV (Night Vision) allows you to send and receive text messages in the dark! With NV, you can text in places such as cinemas, restaurants, theatres, in bed, or any other dark setting - NV allows you to text where the brightness of your phone screen would normally be hard on your eyes and a distraction to others.

When NV is enabled, any text messages you receive will be displayed in a full-screen popup optimized for dark settings. Its easy on your eyes, and doesnt light up the room.

Features :
  • Quick-reply: you can reply to received messages right from the night vision popup!
  • Customizable: you can change the color of your night vision popup.
Required Android O/S : 2.1+

Screenshots :


Download : 2Mb APK


Read More..

Paper Camera 1 2c apk download Android


Come scaricare le applicazioni Per scaricare le applicazioni da filesonic bisogna cliccare su slow download e aspettare circa 30 secondi , dopodichè inserire il codice riportato sulla figura e clicca AVVIA DOWNLOAD . Se volete scaricare più rom senza aspettare molto tempo dovete spegnere il modem e riaccenderlo in modo da cambiare ip oppure usare un proxy . Altrimenti dovete aspettare circa 15 min
Read More..