Rabu, 02 April 2014

/*
Program to calculate the power of a number using recursion.
*/
import java.io.*;
class power
{
public static void main(String args[]) throws IOException
{
BufferedReader br = new BufferedReader(new
InputStreamReader(System.in));
power call = new power();
System.out.print("Enter number : ");
int x = Integer.parseInt(br.readLine());
System.out.print("Enter power : ");
int y = Integer.parseInt(br.readLine());
System.out.println("
" +x +"^" +y +" = "
+call.findPower(x,y));
}
int findPower(int x, int y)
{
if(y==0)
return 1;
else if(y==1)
return x;
else
return x*findPower(x,y-1);
}
}


/**
* ALGORITHM :
* ---------
* 1. Start
* 2. Accept a number from user.
* 3. Ask user to enter the power.
* 4. Using method of recursion, find the value.
* 5. Print this value.
* 6. End
*/

/*
OUTPUT :
------
Enter number : 4
Enter power : 3
4^3 = 64
*/


Read More..

Selasa, 01 April 2014


In this application, we will learn how to use broadcast receiver and how to get the battery level and display it on the progress bar. We used one text view to display battery level and one progress bar to display battery level in progress. Create a new project. Open an XML file and use text view and progress bar in a linear layout. The code of the Android XML file is given below:


<LinearLayoutxmlns:android="http://schemas.android.com/apk/res/android"
  android:layout_width="fill_parent"
  android:layout_height="fill_parent"
  android:orientation="vertical"
  android:background="#abc">
<TextView
  android:id="@+id/textView1"
  android:layout_width="wrap_content"
  android:layout_height="wrap_content"
  android:text=""
  android:textSize="25sp"
  android:layout_gravity="center"
/>
<ProgressBar
  android:id="@+id/progressBar1"
  style="?android:attr/progressBarStyleHorizontal"
  android:layout_width="wrap_content"
  android:layout_height="wrap_content"
  android:layout_gravity="center"
  android:minHeight="100dp"
  android:minWidth="200dp"/>
</LinearLayout>

Now open your Java file, initialize broadcast object and use broadcast class as a nested class. Here, we are registering a broadcast object with a battery changed intent filter which will receive updates on every level of the battery changed. Whenever the battery level changes, onReceive() method will be called, which will take two parameters. Use the code in onReceive() method to do whatever is required to be done on every level of battery change. We are setting a level on progress bar, displaying level on text view and whenever battery level becomes 100% then a song, stored in the assets folder, will start playing. The code of the Android Java file is given below with explanation:


packagecom.exampl.aaaa;
importjava.io.IOException;
importandroid.media.MediaPlayer;
importandroid.os.Bundle;
importandroid.app.Activity;
importandroid.content.BroadcastReceiver;
importandroid.content.Context;
importandroid.content.Intent;
importandroid.content.IntentFilter;
importandroid.content.res.AssetFileDescriptor;
importandroid.widget.ProgressBar;
importandroid.widget.TextView;

publicclassMainActivity extendsActivity {
  //broadcast class is used as a nested class
  privateBroadcastReceiver mbcr=newBroadcastReceiver()
  {
  //onReceive method will receive updates
  publicvoidonReceive(Context c, Intenti)
  {
  //initially level has 0 value
  //after getting update from broadcast receiver
  //it will change and give battery status
  intlevel=i.getIntExtra("level", 0);
  //initialize all objects
  ProgressBar pb=(ProgressBar)findViewById(R.id.progressBar1);
  TextView tv=(TextView)findViewById(R.id.textView1);
  //set level of progress bar
  pb.setProgress(level);
  //display level on text view
  tv.setText("Batterylevel:"+Integer.toString(level)+"%");
  //start a song when the battery level touches 100%
  if(level==100)
  {
   try
   {
   //Save small.mp4 in assets folder
  //we can not start a media file from the drawablefolder directly in broadcast method
   //hence we used the assets folder
   AssetFileDescriptor afd=getAssets().openFd("small.mp4");
   MediaPlayer mp=newMediaPlayer();
   //set file and starting point and ending point in bytes
   mp.setDataSource(afd.getFileDescriptor(), afd.getStartOffset(), afd.getLength());
   mp.prepare();
   //start song
   mp.start();
    }
    catch(IOException e){}
   }
  }
};
  /** Called when the activity is first created. */
  @Override
  protectedvoidonCreate(Bundle savedInstanceState) {
   super.onCreate(savedInstanceState);
   //set layout
   setContentView(R.layout.activity_main);
   //register broadcast receiver
   //Get battery changed status
   //we can get more options like power connect, disconnect, call, etc.
   //To get more options, write Intent followed by a dot(.) and press CTRL+Space
   //you will get all the options
   registerReceiver(mbcr,newIntentFilter(Intent.ACTION_BATTERY_CHANGED));
  }
}
  
Now run your project and test application. If you have any doubts please comment. Share and help others. 
Read More..

Music Audio ZPlayer 3 1 3 Android

ZPlayer 3.1.3 (Android)

ZPlayer 3.1.3 (Android)
Requirements: Android 2.1+
 
ZPlayer 3.1.3 (Android) Overview: Windows Phone 7 / Zune themed media player for Android OS.

you might need to uninstall the application before upgrading to version 3.x some database changes have made the application crash after upgrading, but a new installation (or clearing application data) should fix the issue.

Welcome to ZPlayer a Windows Phone 7 / Zune themed player, a better richer and more interactive media player.

Get album reviews, artist biographi
Now with more widgets, fast forward and rewind controls, headset controls home screen customization, equalizer, audio effects. You can start with your own media, and learn about other artists, other tracks and what other people are listening too. Pair this media player with a last fm account and submit likes, now playing status, and scrobble tracks.

*note The Application uses android framework Audio Effect API, this API was introduced since android 2.3. Therefore only devices that have at least Android version 2.3 will be able to take advantage of this feature.
++ if you use a third party equalizer that controls the output mix for all media playing on the device, disable it before using this application. This application needs to control its own audio effects.
-audio effects implemented include Equalizer, Bassboost and Virtualizer based on Android 2.3

Whats in this version : 
(Updated : Apr 12, 2012)
  • fixed reported force closes
  • homescreen scrolling lag fixeds.
ZPlayer 3.1.3 (Android) screenshot:
ZPlayer 3.1.3 (Android)

Code:
https://play.google.com/store/apps/details?id=app.odesanmi.and.wpmusic 

Download ZPlayer 3.1.3 (Android)

Code:
http://rapidgator.net/file/4073749/ZPlayer.3.1.3.Android.zip.html 
http://depositfiles.com/files/bafznxrpg 
http://bitshare.com/files/4dc0wsvk/ZPlayer.3.1.3.Android.zip.html 
http://jumbofiles.com/hz94gnqg5opc 
Read More..

Senin, 31 Maret 2014

The definitive guide to building data-driven Android applications for enterprise systems

Android devices represent a rapidly growing share of the mobile device market. With the release of Android 4, they are moving beyond consumer applications into corporate/enterprise use. Developers who want to start building data-driven Android applications that integrate with enterprise systems will learn how with this book. In the tradition of Wrox Professional guides, it thoroughly covers sharing and displaying data, transmitting data to enterprise applications, and much more.
  • Shows Android developers who are not familiar with database development how to design and build data-driven applications for Android devices and integrate them with existing enterprise systems
  • Explores how to collect and store data using SQLite, share data using content providers, and display data using adapters
  • Covers migrating data using various methods and tools; transmitting data to the enterprise using web services; serializing, securing, and synchronizing data
  • Shows how to take advantage of the built-in capabilities of the Android OS to integrate applications into enterprise class systems
Enterprise Android prepares any Android developer to start creating data-intensive applications that today’s businesses demand

October 28, 2013  1118183495  978-1118183496 1


Read More..
Hey there.

If you are a cheap ass like me and you dont want to spend any money on an android screencast app, I will tell you today how you can make a really cool video from your android apps with free software!

All you need is linux :)

Recording the android emulator
To record your screen you need istanbul.


  • After you started it, you will notice a small icon on the upper right of your screen. 
  • Do a right click on it and select "select window to record" and select your android emulator. 
  • After this you can click on the icon to stat recording and do what ever you want with your app.
  • If yo are finished, click again on the istanbul icon to stop it and save the video somewhere as "appvideo.avi".


Fixing your video
Istanbul has some problems, so you have to run the following command to fix the video file:
For this you need mencoder.

"mencoder appvideo.avi -ovc lavc -lavcopts vcodec=mpeg4:vpass=1 -oac copy -o appvideo_fixed.avi"

Cropping your video
After this step you are ready to get rid of the emulator screen around your video. This can easily be done using avidemux.

  • Open avidemux and load the file "appvideo_fixed.avi"
  • Now on the left under "video" select "copy" and set it to something like "MJPEG". 
  • Select "Filter" and choose crop filter. You can now crop the emulator out of the video. Best settings for me are left: 20, top 20, bottom 20 and right 435.
  • Now click save and you are done!


Upload your video to youtube and enjoy!

To fix all videos created by istanbul, use this script:

#!/bin/bash
FILES=*.avi
for f in $FILES
do
echo "Processing $f"
mencoder $f -ovc lavc -lavcopts vcodec=mpeg4:vpass=1 -oac copy -o "$f"_fixed
 

 # do something on $f
done


Read More..

Minggu, 30 Maret 2014

Learning C 6 Subprograms

I jus rewrote and corrected the code of the app from LESSON #4 because on run it had an error: "Segmentation fault (core dumped)". But I wanted to complicate it and I added a new function that transfor an array in a matrix and I worked with subprograms because I think its more clearly and nice. So, the same example:
Transformation from matrix to array:
1 2 3 4
5 6 7 8= A[3][4] where A.lin=3 and A.col=4 so => V.elem=3*4=12
9 0 1 2
So 
1 2 3 4 5 6 7 8 9 0 1 2= V.vector[12]
The formula is:
k=A.col*i+j 

Transformation from array to matrix:
1 2 3 4 5 6 7 8 9 0 1 2= V.vector[12]=> V.elem=12.=>
1 2 3 4
5 6 7 8=A[3][4]
9 0 1 2
The formulas are:
i=k/A.col and j=k%A.col
And the code is:
-----------------------------------------------------------------------------------------------
def.c
typedef struct{
double **matr;
int lin;
int col;
}Matrice;
typedef struct{
double *vector;
int elem;
}Array;
int i,j,k;
Matrice A,B; Array V;
-----------------------------------------------------------------------------------------------
functii.c
// citire matrice
void citire_matr(Matrice A){
     for(i=0;i<A.lin;i++)
                    { for(j=0;j<A.col;j++)
                                     scanf("%lf",&A.matr[i][j]);
     }
}
//afisare matrice
void afisare_matrice(Matrice A){
     for(i=0;i<A.lin;i++)
                     {for(j=0;j<A.col;j++)
                                     printf("%lf ",A.matr[i][j]);
                     printf("
");
                     }
     printf("
");
     }
//afisare vector
void afisare_vector(Array V){
     for(k=0;k<V.elem;k++)
                       printf("%lf ",V.vector[k]);
     printf("
");
     }
//transformare matrice->vector
void matr_vector(Matrice A, Array V){
      for(i=0;i<A.lin;i++)
                     for(j=0;j<A.col;j++)
                                     V.vector[A.col*i+j]=A.matr[i][j];
     }

//transformare vector->matrice

void vectortomatr(Matrice B, Array V){
    i=j=k=0;
    while(k<V.elem){
    B.matr[k/B.col][k%B.col]=V.vector[k];
    i++;j++;k++;
    }
}

-----------------------------------------------------------------------------------------------
main.c
#include<stdio.h>
#include<stdlib.h>
#include "def.c"
#include "functii.c"
int main(){
printf("Nr de linii si numarul de coloane este:");scanf("%d %d",&A.lin,&A.col);
V.elem=A.col*A.lin;
B.lin=A.lin; B.col=A.col;
A.matr=(double **) malloc(A.lin*sizeof(double*));
B.matr=(double **) malloc(B.lin*sizeof(double*));
V.vector=(double *)malloc(V.elem*sizeof(double));
for(i=0;i<A.lin;i++) // aloca memorie pt elem din linia i
    if((A.matr[i]=(double *)malloc(A.col*sizeof(double)))==NULL || (B.matr[i]=(double *)malloc(B.col*sizeof(double)))==NULL)
      {
      printf("
 memorie insuficienta");
      exit(1) ;
      }
else 
if(V.vector==NULL)
{
      printf("
 memorie insuficienta");
      exit(1) ;
      }
citire_matr(A);
printf("Afisare matrice:
");
afisare_matrice(A);
matr_vector(A,V);
printf("Afisare vector:
");
afisare_vector(V);
vectortomatr(B,V);
printf("Afisare matrice:
");
afisare_matrice(B);
free(A.matr);
free(B.matr);
free(V.vector);
system("pause");
return 0;
}

-----------------------------------------------------------------------------------------------
     

Read More..

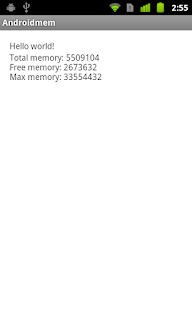
Get memory information

Example to get memory information using Runtime.

memory information


package com.example.androidmem;

import android.os.Bundle;
import android.app.Activity;
import android.widget.TextView;

public class MainActivity extends Activity {

@Override
protected void onCreate(Bundle savedInstanceState) {
super.onCreate(savedInstanceState);
setContentView(R.layout.activity_main);

TextView memInfo = (TextView)findViewById(R.id.meminfo);

String info = "";

info += "Total memory: " + Runtime.getRuntime().totalMemory() + "
";
info += "Free memory: " + Runtime.getRuntime().freeMemory() + "
";
info += "Max memory: " + Runtime.getRuntime().maxMemory() + "
";

memInfo.setText(info);
}

}


<LinearLayout xmlns:android="http://schemas.android.com/apk/res/android"
xmlns:tools="http://schemas.android.com/tools"
android:layout_width="match_parent"
android:layout_height="match_parent"
android:paddingBottom="@dimen/activity_vertical_margin"
android:paddingLeft="@dimen/activity_horizontal_margin"
android:paddingRight="@dimen/activity_horizontal_margin"
android:paddingTop="@dimen/activity_vertical_margin"
android:orientation="vertical"
tools:context=".MainActivity" >

<TextView
android:layout_width="wrap_content"
android:layout_height="wrap_content"
android:text="@string/hello_world" />
<TextView
android:id="@+id/meminfo"
android:layout_width="wrap_content"
android:layout_height="wrap_content" />

</LinearLayout>


Read More..